AOP

  • 관점 지향 프로그래밍(Aspect Object Programming)

  • 횡단 관심사 (CrossCutting)

  • Pure Java로 구현

  • OOP 모듈의 핵심단위가 클래스라면, AOP 모듈의 핵심단위 Aspect 이다.

  • Spring IOC 컨테이너는 AOP에 의존하지 않는다.

개념

  • Aspect: 여러 클래스에 부가되는 영향을 미치는 모듈. @Aspect 혹은 aspect 구현 클래스. 가장 좋은 예는 transaction

  • Join point: 메소드의 실행이나 예외 처리 같은 프로그램의 실행 중의 지점

  • Advice: 특정 조인 포인트에서 Aspect에 의해 취해지는 액션. around, before, after .

  • Pointcut: 어드바이스를 적용할 조인포인트의 선별 기능을 정의한 모듈.

    • 포인트 컷 표현에 의해 일치하는 조인포인트를 구별하는게 스프링 aop의 핵심이며, aspectJ pointcut 표현식을 사용한다.

  • Target object: 하나 혹은 여러 aspect에 의해 advised된 object. 항상 runtime proxies에 의해 구현되므로 proxied object 이다.

  • Introduction: advised object에 추가적인 메소드 및 필드를 선언할 수 있다.

  • AOP proxy: 타겟 객체를 감싸서 타겟의 요청을 대신 받아주는 오브젝트. 타겟 실행 전, 후 처리 

    • 프록시는 타겟의 요청을 가로챈 후 advise를 먼저 실행하며 이후 타겟 메소드를 실행한다.

  • Weaving: 지정된 객체에 aspect를 적용해서 새로운 advised 객체를 생성하는 과정. 런타임에 위빙이 수행된다.

advice type

  • Before advice : join point 전에 실행되는 advice. 예외를 던지지 않는 한 join point가 실행되는 것을 막을 수는 없다.

  • After returning advice : join point가 정상적으로 완료된 후 실행되는 advice

  • After throwing advice: 메소드가 예외를 throw하고 종료되면 실행되는 advuce

  • After (finally) advice: return 혹은 예외와 관계없이 join point 이 후 무조건 실행되는 advice

  • Around advice : 메소드 호출과 같이 join point를 감싸는 advice

    • 가장 강력한 advice
    • 메소드 호출 전 혹은 후 사용자 정의 동작을 정의할 수 있음
    • 조인 포인트에서 계속 수행할지 혹은 return이나 예외를 Throw하여 advice를 선택할지 정할 수도 있다.

Around Advice

  • Around Advice는 모든 유형의 advice를 제공하는 가장 일반적이고 강력한 advice이다.
  • 스프링에서 왠만하면 Around Advice를 사용하기를 권고한다.

핵심

  • 포인트 컷에 의해 매칭되는 조인포인트의 개념이 AOP의 핵심이다.
  • 포인트 컷은 객체지향 구조와 독립적으로 advice를 가능하게 한다.
  • 예를 들면.. 선언적 transaction management

https://docs.spring.io/spring/docs/current/spring-framework-reference/core.html#aop


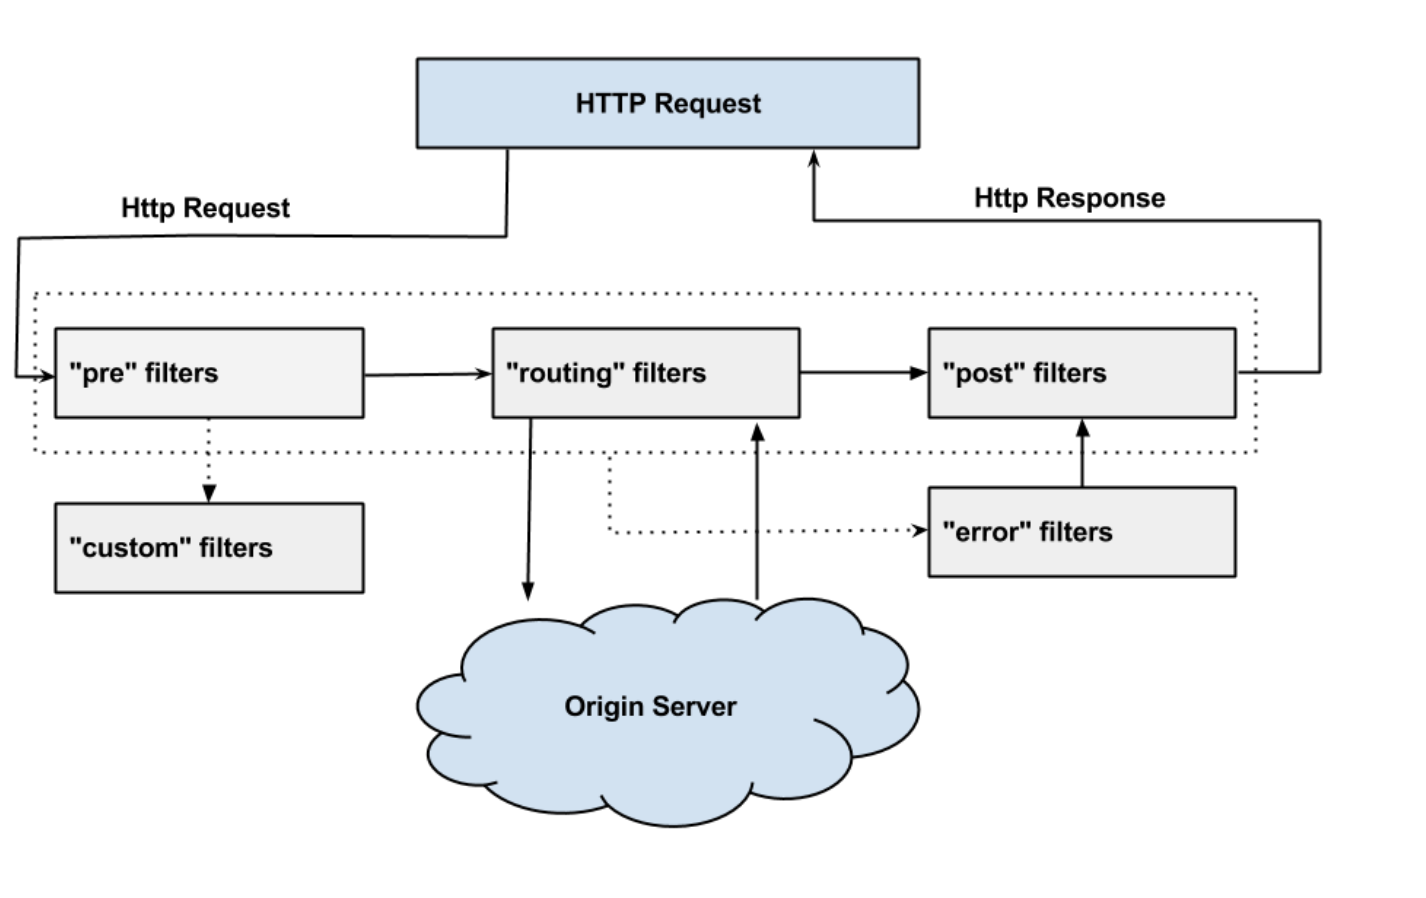
Zuul은 Frontend로 부터 모든 요청을 받아 내부 마이크로서비스들에게 요청을 전달하므로 단일 종단점을 갖게하는 API Gateway 와 같은 역할을 수행한다. zuul 필터에 의해 다음과 같은 기능을 수행할 수 있다.


- CORS

- 인증

- 보안

- 라우팅

- 프록시


zuul filter


Zuul Filter는 크게 4가지 Filter로 나누어 진다.

  1. PRE Filter - 라우팅전에 실행되며 필터  ex) 인증
  2. ROUTING Filter - 요청에 대한 라우팅을 다루는 필터 ex) ribbon을 통한 라우팅
  3. POST Filter - 라우팅 후에 실행되는 필터 ex) resoponse에 대한 처리
  4. ERROR Filter - 에러 발생시 실행되는 필터


https://medium.com/netflix-techblog/announcing-zuul-edge-service-in-the-cloud-ab3af5be08ee


Announcing Zuul: Edge Service in the Cloud

the latest addition to Netflix’s Open Source Software suite

medium.com


https://github.com/Netflix/zuul/wiki/How-We-Use-Zuul-At-Netflix


Netflix/zuul

Zuul is a gateway service that provides dynamic routing, monitoring, resiliency, security, and more. - Netflix/zuul

github.com


'Framework > Spring ' 카테고리의 다른 글

Spring AOP (1)  (0) 2019.08.02
Spring Cloud Netflix (2) - hystrix  (0) 2019.02.25
Spring Cloud Netflix (1) - OverView  (0) 2019.02.10
Spring Websocket (Handler, STOMP, Reactive Websocket)  (6) 2019.02.10

Hystrix


- Hystrix는 Netflix에서 공개한 대부분의 OSS에서 범용적으로 사용되는 오픈소스 라이브러리이다.


Hystrix는 다음과 같은 특징을 따른다.


- 분산환경을 위한 Latencey and Fault Tolerance 시스템

- 복잡한 분산 시스템에서 cascading failure를 멈춤

- 실패에 대해 빠르고 급격한 회복

-  gracefully degrade와 fallback

- 거의 실시간으로 모니터링, 경고, 작동 제어가 가능하다.


Cascade Failure - 서비스간 장애 전파


대부분의 마이크로 서비스 아키텍쳐로 설계된 시스템에서 서비스 컴포넌트는 무수히 많이 존재하며, 서비스와 서비스 혹은 서비스와 게이트웨이 등 컴포넌트 별 호출은 일반적으로 REST-end-point를 가지기 때문에 Http 통신을 통해 서비스를 호출한다. 


그런데 만일 어떤 서비스 컴포넌트나 Database, 아니면 시스템이 다운 됐을 경우 의존적으로 연결된 각 서비스는 Cascade Failure(계단식 오류, 연속적 오류)를 맞이하게 된다.


출처: https://subscription.packtpub.com/book/application_development/9781788624398/8/ch08lvl1sec60/when-the-services-fail-hello-hystrix


그림을 보면 쉽게 이해 할 수 있는데 장애가 발생한 Y서비스에, A서비스와 연결된 end-point를 comsumer가 호출할 경우 ex) /Service-Y/Service-A, A서비스와 M서비스 또한 잠재적으로 장애가 연속적으로 발생할 가능성이 높다.


이와 같은 문제를 Circuit Breaker Pattern을 통해 도움을 받을 수 있다.


Circuit Breaker Pattern


Hystrix는  Circuit breaker 패턴을 자바 기반으로 오픈소스화한 라이브러리이다. 


출처: https://amandeepbatra.wordpress.com/2015/01/05/what-is-circuit-breaker-design-pattern/


- 만일 서비스가 정상적인 상황이라면, Client Request는 Remote Service를 호출하도록 by-pass한다.

- Database의 서비스가 장애가 발생했다면, 복구 될 때까지 Fallback 메세지와 함께 5xx response를 반환할 수 있다.


Hystrix Flow Chart


flow 차트는 위와 같은데, 아래의 코드를 통해 비교해보자

spring-cloud-starter-netflix-hystrix는 annotation 기반으로 간단하게 구성할 수 있다. Getting_Started

아래 코드는 spring-cloud-starter-netflix-hystrix가 아닌 webflux와 hystrix-javanica library를 추가해 각 단계별에 대해 분석하였다.


dependencies {
compile('com.netflix.hystrix:hystrix-javanica:1.5.10')

compile('org.springframework.boot:spring-boot-starter-webflux')

}


1. HystrixCommand나 HystrixObservableCommand Object를 생성한다.


1
2
3
4
5
6
7
8
9
10
11
12
13
14
15
16
17
 static class MessageCacheGetCommand extends HystrixObservableCommand<Object> {
 
        @Autowired
        private final StatefulRedisConnection<StringString> redisConnection;
        private String id;
 
        private static Setter setter = Setter
                .withGroupKey(HystrixCommandGroupKey.Factory.asKey(MessageCacheGetCommand.class.getSimpleName()))
                .andCommandKey(HystrixCommandKey.Factory.asKey(MessageCacheGetCommand.class.getSimpleName()))
                .andCommandPropertiesDefaults(
                        HystrixCommandProperties.Setter()
                                .withExecutionIsolationStrategy(HystrixCommandProperties.ExecutionIsolationStrategy.SEMAPHORE)  // semaphore strategy
                                .withExecutionIsolationSemaphoreMaxConcurrentRequests(5// failure 5 requsts, circuit on.
                                .withExecutionTimeoutEnabled(true)
                                .withExecutionTimeoutInMilliseconds(100)
  );


cs


2. execute(sync), queue(async), observe(hot observable), toObservable(cold observable) 중 선택하여 실행


1
2
3
4
 public Observable<Object> get(String id) {
        return new MessageCacheGetCommand(redisConnection, id).toObservable();
   }
 
cs


3. 캐쉬 응답이 있다면, Response를 수행한다.


4. Circuit이 Open되어 있으면 8) 단계로 넘어 간다.

1
2
3
4
5
if (HystrixCircuitBreaker.Factory.getInstance(HystrixCommandKey.Factory.asKey(MessageCacheGetCommand.class.getSimpleName())).allowRequest()) {
            redisConnection.sync().setex(id, expireTimeSeconds, value);
        } else {
            log.info("Cache update canceled, Circuit breaker opened!");
        }
cs


5. Thread Pool/Queue/Semaphore가 Full이면 8)로 넘어간다.

6. HystrixObservableCommand.construct() 또는 HystrixCommand.run()을 수행한다. 수행 중 실패하거나 Timeout이 초과되면 8) 단계로 아니면 9) 종료 단계로 간다.


1
2
3
4
5
6
7
8
9
10
11
 
        @Override
        protected Observable<Object> construct() {
            return redisConnection.reactive()
                    .get(id)
                    .defaultIfEmpty(null)
                    .map(value -> {
                        return value;
                    });
        }
 
cs


7. Circuit Health를 계산한다. Hystrix는 성공, 실패, Rejection 또는 Timeout 등의 정보를 Circuit Breaker에게 제공한다. Circuit Breaker는 이를 기반으로 Circuit을 열고 닫는다.

8. Fallback은 각 단계에서 실패, Timeout, Rejection 등이 발생할 때, 명시적인 핸들링을 할 수 있게하고 적절한 Response를 리턴할 수 있게한다.

1
2
3
4
   @Override
        protected Observable<Object> resumeWithFallback() {
            return Observable.empty();
        }
cs


9. 성공적으로 Response를 반환한다.


출처


https://github.com/Netflix/Hystrix/wiki/How-it-Works

https://medium.com/@goinhacker/hystrix-500452f4fae2

https://bcho.tistory.com/1247

https://supawer0728.github.io/2018/03/11/Spring-Cloud-Hystrix/

'Framework > Spring ' 카테고리의 다른 글

Spring AOP (1)  (0) 2019.08.02
Spring Cloud Netflix (3) - zuul  (0) 2019.06.06
Spring Cloud Netflix (1) - OverView  (0) 2019.02.10
Spring Websocket (Handler, STOMP, Reactive Websocket)  (6) 2019.02.10


Spring-Cloud-Netflix


Spring Cloud Netflix자동 환경 설정과 Spring Environment 및 다른 Spring 프로그래밍 모델 관념의 바인딩을 바탕으로 Spring Boot 어플리케이션을 위한 Netflix OSS(Open Source Software) 통합을 제공합니다. 몇 가지 간단한 어노테이션을 사용하여 어플리케이션 내부의 공통 패턴을 신속하게 사용하고 설정할 수 있습니다. 그리고 battle-tested를 거친 Netflix component를 통해 대규모 분산 시스템을 구축할 수 있습니다.


제공되는 패턴은 다음과 같다.


1. Service Discovery (Eureka) : 자바 환경 구성으로  embeded Eureka 서버를 설정할 수 있으며,  eureka 인스턴스를 등록한 서비스를 클라이언트는 스프링이 관리하는 bean을 

사용하여 발견할 수 있다.

2. Circuit Breaker (Hystrix) : Hystrix 대쉬보드 및 어노테이션을 통한 hystrix 클라이언트 구현 

3. Declarative REST Client (Feign) : Feign은 JAX-RX 혹은 MVC Annotation으로(선언적) 인터페이스를 동적으로 구현한다.

4.  Client Side Load Balancer(Ribbon) : zuul에 내장된 로드 밸런서 

5. External Configuration : Spring 환경에서 Archaius로 연결 (Spring Boot를 사용하여 Netflix 구성 요소를 설정 가능)

6. Router and Filter - Proxy(Zuul) : Zuul 필터의 자동 등록 및 Reverse Proxy 생성 설정 접근에 대한 간단한 규칙


Spring-Cloud-Netflix EchoSystem


spring-cloud-netflix 생태계는 간단하게 다음과 같다.


1. 모든 요청은 Zuul(API-Gateway)에서 처리되며, URI에 맞는 서비스를 라우팅한다. 만약 동일한 서비스가 여러 개의 인스턴스에 있는 경우에는 로드밸런싱을 통해 트래픽을 나눈다. 이는 Zuul에 내장된 Ribbon이 하는 기능이며, Default는 라운드로빈 방식에 의해 분산이 된다.


2. 모든 서비스는 유레카 서버에 등록된다.

3. 인스턴스간의 모든 호출(서비스와 서비스, gateway와 서비스 ... 등)  사이에는  Hystrix Circuit breaker 패턴이 적용된다.


https://www.optisolbusiness.com/insight/micro-services-architecture-spring-boot-and-netflix-infrastructure

https://spring.io/projects/spring-cloud-netflix


'Framework > Spring ' 카테고리의 다른 글

Spring AOP (1)  (0) 2019.08.02
Spring Cloud Netflix (3) - zuul  (0) 2019.06.06
Spring Cloud Netflix (2) - hystrix  (0) 2019.02.25
Spring Websocket (Handler, STOMP, Reactive Websocket)  (6) 2019.02.10

WebSocket 

레퍼런스에 따르면, websocket은 웹 브라우저(클라이언트)와 서버간의 full-duplex(양방향), bi-directional(전이중적), persistent connection(지속적인 연결)의 특징을 갖는 프로토콜이라고 규정한다. 

여기서 핵심은 클라이언트와 서버간의 지속적인 연결을 한다는 점이다.  Websocket이 탄생하기 이전에는 HTTP을 통해 양방향 통신을 하기 위해  polling, long polling, http streaming과 같은 방식을 사용했다.


Http Polling : 클라이언트가 지속적으로 서버로  request를 하여 이벤트를 수신하는 방식이다. 가장 간단한 방법이지만, 지속적으로 서버에 요청을 던지기 때문에 서버의 오버헤드를 고려할 수 밖에 없는 상황이다.

Http Long Polling: polling에 비해 클라이언트는 이벤트를 받기 전까지 다음 요청을 날리지 않는다. 하지만, 원하는 이벤트를 얻기 위해 지속적으로 요청해야한다는 점에서 서버의 부담은 여전히 증가된다.

Http Streaming: 서버는 클라이언트로부터 request를 받으면, response을 주고 연결을 끊지 않고. 이벤트가 발생함에 따라 클라이언트로 전송하는 방식인데 역시나 근본적인 원인인 해결하지 못한다.


물론 위의 방식으로 원하는 데이터를  클라이언트와 서버간의 주고 받는데 문제는 없다. 하지만 HTTP 프로토콜 특성의  request-response의 지속적인 수행 그리고 그에 따른 중복적인 패킷전달(http-header) 문제로 인해 속도 저하 및 오버헤드는 근본적으로 문제가 있게 된다.


쉽게 말하면, 내가 원하는 데이터에 비해  동반되는 데이터들이 너무 많고, 지속적으로 이 데이터를 포함해야 하며 맺고 끊는 연결을 계속하는 등 리소스의 낭비가 크다는 점이다.


그래서 웹 브라우저 환경에서 tcp 통신처럼 연결 지향 프로토콜이 필요했는데 이를 해결하기 위해, 2011년 Websocket 프로토콜이 탄생하게 되었다. 

그렇다면, Websocket과 TCP는 어떤 차이가 있는 걸까?


1. 웹소켓은 연결 요청에 대해 http를 통해 switching 및 Handshaking이 이루어진다. (웹소켓 프로토콜 분석하기)

2. TCP는 Binary 데이터만 주고 받을 수 있지만, Websocket은 Binary 데이터 뿐만 아니라 Text 데이터를 주고 받을 수 있다


탄생 배경과 정의 그리고 특성으로 미루어 보아, WebSocket은 HTTP와 TCP의 특성을 섞어 놓은 프로토콜이며 

결국 핵심은 웹 브라우저 환경에서 연결지향 통신하기 위한 기술이라는 점이다.


Spring WebSocket 

Spring Websocket은 Spring 4.0 부터 지원하며, Maven 3.2+, gradle 4+, jdk8 이상 필요하다.

Spring에서는 2가지 방식으로 Websocket 을 구현 할 수 있다.


- WebSocket 데이터를 직접 처리

- Stomp 프로토콜을 사용하여  메세징 처리


1) Websocket Data 직접 처리


Config를 통해 Websocket 옵션을 설정할 수 있다. 그리고  웹소켓 핸들러를 상속받은  클래스는 low level 수준에서 원시적으로 데이터를 처리할 수 있으며,  다음과 같은 4가지 이벤트를 처리 할 수 있다.

1
2
3
4
5
6
7
8
9
10
@Configuration
@EnableWebSocket
public class WebSocketConfig implements WebSocketConfigurer {
    @Override
    public void registerWebSocketHandlers(WebSocketHandlerRegistry registry) {
//        WebSocket을 사용할 수없는 경우 대체 전송을 사용할 수 있도록 SockJS 폴백 옵션을 활성화합니다.
//        SockJS 클라이언트는 "/ws"에 연결하여 사용 가능한 최상의 전송 (websocket, xhr-streaming, xhr-polling 등)을 시도.
        registry.addHandler(new WsTranportHandler(), "/ws").setAllowedOrigins("*").withSockJS();
    }
}
cs


눈여겨 봐야 할 설정은 registerStompEndpoints 메소드이다. 

Websocket은 안타깝게도 모든 브라우저를 지원하지 않는데, 만일 브라우저 버전이 Websocket을 호환하지 않는 경우 설정을 통해 폴백 옵션을 활성화 할 수 있다.

또한 CORS(Cross Origin Resource Sharing) 문제 또한 옵션을 통해 해결할 수 있다.


@Component
public class WsTranportHandler extends TextWebSocketHandler {
 
    // connection이 맺어진 후 실행된다
    @Override
    public void afterConnectionEstablished(WebSocketSession session) throws Exception {
        System.err.println("session connected +=" + session);
    }
    // 메세지 수신
    @Override
    public void handleMessage(WebSocketSession session, WebSocketMessage<?> message) throws Exception {
        System.err.println("handle message +=" + session) + ", message=" + message);
 
        //echo Message
        session.sendMessage(message);
 
    }
    // transport 중 error
    @Override
    public void handleTransportError(WebSocketSession session, Throwable exception) throws Exception {
        System.err.println("transport error =" + session +", exception =" + exception);
    }
    // connection close
    @Override
    public void afterConnectionClosed(WebSocketSession session, CloseStatus closeStatus) throws Exception {
 
        System.err.println("session close -=" + session);
 
    }
}


그리고 WebSocketHandler를 상속받은 클래스는 직접 세션레벨에서 데이터를 Handle 해야한다.


2) Stomp 프로토콜을 사용하여  메세징 처리


우선 STOMP 프로토콜은 (simple text oriented messaging protocol)의 약자이며, 텍스트 기반의 프로토콜이다.


스프링 문서에 Websocket과 함께 STOMP 프로토콜을 사용하는 방법은 위와 같은데, Spring 내부의 In Memory Broker를 통해 메세지를 처리한다.

도식화 된 그림의 키포인트는 3가지이다.


1)  Receive Client

2) Send Client

3) Brkoer


Receive Client

- 메세지를 받기 위해 특정 토픽이 사전에 서버에 subscribe 되어야 한다.


Send Client

- 서버와 연결된 클라이언트는 특정 path로 ex) /app/message  전달한다.


Broker

- 메세지 브로커는 Kafka, RabbitMQ, ActiveMQ 등의 오픈소스들 처럼  MQ 이며, pub/sub 모델을 따른다. 토픽에 따라 메세지를 전달해야 하는 사용자를 구분한다.

- 연결된 클라이언트의 세션을 관리한다.

- 특정 토픽과 메세지를 Mapping 하여, 토픽을 구독하는 세션에 존재하는 클라이언트에게 메세지를 전달한다.


Configuration

1
2
3
4
5
6
7
8
9
10
11
12
13
14
15
16
17
18
19
20
21
22
23
24
25
26
 
@Configuration
@EnableWebSocketMessageBroker
public class WebSocketStompConfig implements WebSocketMessageBrokerConfigurer {
 
    //messageBroker config
    @Override
    public void configureMessageBroker(MessageBrokerRegistry config) {
 
        //in-memory message-broker, topic에 대한 prefix 설정
         config.enableSimpleBroker("/topic");
 
 
        //메세지를 수신하는 handler의 메세지 prefix 설정
        config.setApplicationDestinationPrefixes("/api");
 
    };
 
    @Override
    public void registerStompEndpoints(StompEndpointRegistry registry) {
       registry.addEndpoint("/ws").setAllowedOrigins("*").withSockJS();
    }
}
 

cs


 Controller


1
2
3
4
5
6
7
8
9
10
11
 
@RestController
public class MessageHandleController {
 
    @MessageMapping("/echo")
    @SendTo("/topic/messages")
    public EchoMessage echo(String message) throws Exception {
        System.err.println(message);
        return  new EchoMessage(message,LocalDateTime.now());
    }
}
cs


그림의 SimpleAnnotationMethod로 된 부분을 @MessageMapping으로 처리할 수 있다.  설정의 setApplicationDestinationPrefix의 /api로 설정했기 때문에, 최종적으로 메세지를 보낼려고 할 경우 /api/echo 로 메세지를 보낸다면, MessageHandler는 메세지를 수신한다. 

@MessageMapping을 통해 메세지를 수신했다면, @SendTo를 통해  특정 토픽을 구독하는 클라이언트에게 메세지를 보낼 수 있다.


Reactive & Spring Webflux 

Spirng5에서는 비동기 측면의 통신에 대한 지원을 확대했으며, Webflux의 Reactor를 통해 reactive-stream에 대한 사양을 정의 했다.


기존의 수 많은 Http 요청의 처리 성능(throughput)을 증가 시키기 위해, 톰캣 쓰레드를 더 많이 할당하는 방식으로 구현되었으나 Spring5 에서는 적은 수의 쓰레드로  Reactive-stream에서 비동기 처리를 지향한다.


Reactive Websocket 

Spring5 에서는 websocket 채널에 Reactive 능력을 추가함에 따라 조금 더 유연하게 사용할 수 있도록 지원하였다.


spring5 에서 web flow는 다음과 같다.


https://blog.monkey.codes/how-to-build-a-chat-app-using-webflux-websockets-react/


1. Spring4에서 웹소켓을 직접 처리하는 방식과 같이 기본적으로 WebsocketHandler를 구현하여 처리해야한다.

2. handler는 연결이 설정될 때마다, 웹소켓 세션이 제공되며 세션에는 receive 와 send 를 포함하는 flux stream을 갖게 된다.

3. GMS(UnicastProcessor)를 통해 모든 웹소켓 세션은 연결된다.

4. GMS를 통해 메세지를 보내야 하며, publisher는 websocket session을 통해 receive한  flux 메세지를 수신한다.

5.  GMS는 모든 웹소켓 세션을 연결하고 있지 않고 가장 최근 생성된 25개의 subscrber만 갖고 있으며, 메세지를 전달한다.


reactive websocket echo server 구현하기


websocket을 spring5에서 구현하면, 기본적으로 톰캣이 아닌, netty conatiner 에서 동작한다.


https://docs.spring.io/spring/docs/current/spring-framework-reference/web-reactive.html#webflux-websocket

https://www.baeldung.com/spring-5-reactive-websockets

https://blog.monkey.codes/how-to-build-a-chat-app-using-webflux-websockets-react/

https://docs.spring.io/spring/docs/5.0.0.BUILD-SNAPSHOT/spring-framework-reference/html/websocket.html

http://www.egovframe.go.kr/wiki/doku.php?id=egovframework:rte3.5:ptl:sockjs

https://adrenal.tistory.com/20


'Framework > Spring ' 카테고리의 다른 글

Spring AOP (1)  (0) 2019.08.02
Spring Cloud Netflix (3) - zuul  (0) 2019.06.06
Spring Cloud Netflix (2) - hystrix  (0) 2019.02.25
Spring Cloud Netflix (1) - OverView  (0) 2019.02.10

Netty를 통해 JVM 옵션을 여러가지 설정 할 수 있지만 핵심이라고 생각하는 4가지만 정리하였다.


1) 메모리 leak 검출


java -Dio.netty.leakDetection.level=advanced ...


 DISABLED

  메모리 릭 감지를 비활성화

 SIMPLE

  디폴트 설정이며 버퍼의 1%의 누출이 있는지 나타낸다.

 ADVANCED

  누출된 버퍼의 액세스 위치를 나타낸다.

 PARANOID

  모든 단일 버퍼라는 점을 제외하면 advanced와 동일. 

  leak 검출 시 빌드가 실패 될 수 있다.


2)  DirectBuffer 선호 여부 


java -Dio.netty.noPreferDirect=true ...


noPreferDirect 옵션은 netty는 ByteBufAllocator.buffer(..) 메소드가 호출 될 때, direct buffer는 선호되지 않는다고 개발자에게 알려준다. 그렇다고 해서 . ByteBufAllocator.directBuffer(...)가 직접적으로 directBuffer를 호출할 때 Direct Buffer가 사용되지 않는 것은 아니다. 여전히 사용 중이다.


3) ByteBuf allocator의 풀링 타입


java -Dio.netty.allocator.type=unpooled ...


풀링 여부에는 pooled / unpooled 가 존재한다. 여기서 말하는 풀은 DBCP의 Connection Pool  혹은 Thread Excutor의 Thread Pool과 같은 맥락이다.


즉, ByteBuf의 레퍼런스 카운트와 같은 자원관리를 Pool이 관리할 것이냐 아니면 unpooled 함으로 써 ByteBufAllocator에서 직접 얻어 올 것이냐로 나뉠 수 있다.


4) sun.misc.Unsafe의 사용을 중지하도록 허용


java -Dio.netty.tryUnsafe=false ...


Java 9 이상에서 sun.misc.unsafe 기능이 활성화 됨에 따라 NETTY에서 WARN 및 ERROR를 발생할 만한 요소가 있는데, unsafe 옵션을 비활성화 함으로써 사용을 중지 할 수 있다.


https://github.com/netty/netty/issues/272


Netty Base Http Client example Code


NettyHttpClient


1
2
3
4
5
6
7
8
9
10
11
12
13
14
15
16
17
18
19
20
21
22
23
24
25
26
27
28
29
30
31
32
33
34
35
36
37
38
39
40
41
42
43
44
45
46
47
48
49
50
51
52
53
54
 
public class NettyClient {
 
    ChannelFuture cf;
    EventLoopGroup group;
    
    public void connect(String host, int port) {
 
       group = new NioEventLoopGroup();
 
        try {
            Bootstrap b = new Bootstrap();
            b.group(group).channel(NioSocketChannel.class).option(ChannelOption.TCP_NODELAY, true)
                    .handler(new NettyHttpChannelInit(group));
 
            cf = b.connect(host, port).sync();
//            cf.channel().closeFuture().sync();
        } catch (Exception e) {
            e.printStackTrace();
        }
    }
    
//post Request Encoder : attribute를 지정하고 싶다면, PostRquestEncoder를 통해 요청해야한다.
    public void createRequest(String host, int port, String url) throws Exception {
        
        
            HttpRequest request = null;
            HttpPostRequestEncoder postRequestEncoder = null;
            
            request = new DefaultFullHttpRequest(HttpVersion.HTTP_1_1, HttpMethod.POST, "/create"
//                    ,Unpooled.copiedBuffer(url.getBytes(CharsetUtil.UTF_8))
            );
            request.headers().set(HttpHeaderNames.CONTENT_TYPE, HttpHeaderValues.APPLICATION_X_WWW_FORM_URLENCODED);
            request.headers().set(HttpHeaderNames.HOST, host+":"+port);
            request.headers().set(HttpHeaderNames.CONNECTION, HttpHeaderValues.KEEP_ALIVE);
//            request.headers().set(HttpHeaderNames.CONTENT_LENGTH, url.length());
            
            postRequestEncoder = new HttpPostRequestEncoder(request, false);
            postRequestEncoder.addBodyAttribute("url", url);
            request=postRequestEncoder.finalizeRequest();
            postRequestEncoder.close();
//            cf.channel().writeAndFlush(request).addListener(ChannelFutureListener.CLOSE);
            cf.channel().writeAndFlush(request);
//            System.out.println(request.toString());
    }
    
    public void close() {
        cf.channel().close();
        group.shutdownGracefully();
    }
    
    
}


cs


-> 가장 중요한 부분은 Request Format이다.  DefaultFullHttpRequest객체를 통해 http의 header, body를 직접 정의할 수 있다.

체크해야할 부분이 있다면, PostRequestEncoder. Post방식의 경우 요청 파라미터가 Url에 명시되지 않기 때문에, PostRequestEncoder를 통해 지정가능하다.


Channelinitializer 


1
2
3
4
5
6
7
8
9
10
11
12
13
14
15
16
17
18
19
20
21
22
23
24
25
26
27
28
29
30
31
32
33
34
35
36
37
38
39
40
41
42
43
44
45
46
47
48
 
public class NettyHttpChannelInit extends ChannelInitializer<SocketChannel>{
    
    private boolean ssl = false;
    private EventLoopGroup group;
    
     public NettyHttpChannelInit(EventLoopGroup group) {
         this.group = group;
    }
    @Override
    protected void initChannel(SocketChannel sc) throws Exception {
        // TODO Auto-generated method stub
        
        ChannelPipeline p = sc.pipeline();
        if(ssl) {
            SslContext sslCtx = null;
            try {
                sslCtx = SslContextBuilder.forClient()
                        .trustManager(InsecureTrustManagerFactory.INSTANCE).build();
                 p.addLast(sslCtx.newHandler(sc.alloc()));
            } catch (SSLException e1) {
                // TODO Auto-generated catch block
                e1.printStackTrace();
            }
        }
    
        /**
         *
         * Message Decoder, FastLz...
        */
    
    //    p.addLast(new MessageDecoder());
 
        
        //chunked 된 응답을 집계하는 코덱
        p.addLast("chunked",new HttpObjectAggregator(1048576));
        p.addLast("codec",new HttpClientCodec());
        p.addLast(new NettyHttpHandler(group, sc));
    }
}
cs


-> 채널을 초기화하는 객체에서는 서버에서 데이터를  받기 위해 여러 핸들러를 정의했다. 

샘플 코드에서는 4개의 핸들러를 추가었다.


1) sslCtx.newHandler : SSL,TLS 성립된 서버와의 통신을 위해 추가된 코덱 (https에 해당한다.)


2)HttpObjectAggregator : chunked된 응답을 집계하는 코덱이다.


* Chunked

  - Chunk Response, "덩어리 응답" 전체 페이지를 가공하지 않는다.

  - 서버측에서 html 전부 생성한 후에 클라이언트에게 보내는 것이 아니라 html 덩어리(chunk) 단위로 쪼개서 보낼  있다.

  - 브라우저(클라이언트)에게 전체 컨텐츠 크기가 얼마나 큰지 알려주지 않아도된다는 특징이 있다. 

  - 따라서동적인 크기의 컨텐츠  스트리밍에 적합하고 Chunked transfer encoding 사용해야하며 netty의 경우 httpObjectAggregator 코덱에 해당된다.


3) httpClientCodec


송신시에는 HttpClientCodec을 사용해야 하며. HttpResponseEncoder로 대신 사용할 수 있다.

pipeline.addLast("encoder", new HttpClientCodec());

pipeline.addLast("encoder", new HttpResponseEncoder());


수신시에는 HttpServerCodec 사용해야 하며아래와 같이 HttpRequestDecoder대신 사용할 수 있다.

pipeline.addLast("decoder", new HttpServerCodec());

pipeline.addLast("decoder", new HttpRequestDecoder());


4) NettyHttpHandler : 사용자 정의 핸들러, SimpleChannelInboundHandler를 상속받은 사용자 정의 객체 입니다. 실제 메시지를 확인하기 위해 만들었다.


NettyClientHandler


1
2
3
4
5
6
7
8
9
10
11
12
13
14
15
16
17
18
19
20
21
22
23
24
25
26
27
28
29
30
31
32
33
34
35
36
37
38
39
40
41
42
43
44
45
46
47
48
49
50
51
52
53
54
55
56
57
58
59
60
61
62
63
64
65
66
67
68
69
70
71
72
73
74
75
 
 
public class NettyHttpHandler extends SimpleChannelInboundHandler<HttpObject> {
 
    private EventLoopGroup group;
    private SocketChannel sc;
    private int count=0;
    
 
    public NettyHttpHandler(EventLoopGroup group, SocketChannel sc) {
        this.group = group;
        this.sc =sc;
    }
 
 
    @Override
    public void channelActive(ChannelHandlerContext ctx) throws Exception {
        // TODO Auto-generated method stub
        super.channelActive(ctx);
//        System.out.println("connect:"+ctx.channel().isActive());
    }


    @Override
    protected void channelRead0(ChannelHandlerContext ctx, HttpObject msg) throws Exception {
        // TODO Auto-generated method stub
//        System.err.println(msg);
        
        if (msg instanceof HttpResponse) {
            HttpResponse response = (HttpResponse) msg;
            
            
            System.err.println("STATUS: " + response.status());
            System.err.println("VERSION: " + response.protocolVersion());
            
 
            if (!response.headers().isEmpty()) {
                for (CharSequence name : response.headers().names()) {
                    for (CharSequence value : response.headers().getAll(name)) {
                        System.err.println("HEADER: " + name + " = " + value);
                    }
                }
                System.err.println();
            }
 
            if (HttpUtil.isTransferEncodingChunked(response)) {
                System.err.println("CHUNKED CONTENT {");
            } else {
                System.err.println("CONTENT {");
            }
        }
        if (msg instanceof HttpContent) {
            count++;
            HttpContent content = (HttpContent) msg;
            System.err.println(count+". create url = "+content.content().toString(CharsetUtil.UTF_8));
            System.err.flush();
 
            if (content instanceof LastHttpContent) {
                System.err.println("} END OF CONTENT");
            }
        }
    }


    @Override
    public void exceptionCaught(ChannelHandlerContext ctx, Throwable cause)
            throws Exception {
        cause.printStackTrace();
        ctx.close();
        sc.close();
        group.shutdownGracefully();
    }
cs


Echo Server


1
2
3
4
5
6
7
8
9
10
11
12
13
14
15
16
17
18
19
20
21
22
23
24
25
26
27
28
29
30
31
32
33
34
35
36
37
38
39
40
41
42
43
44
45
46
47
48
49
50
51
52
53
54
55
56
57
58
59
60
61
62
63
64
65
66
67
68
69
70
71
72
73
74
75
76
77
78
79
80
81
82
package netty_framework;
 
import java.net.InetSocketAddress;
import java.net.Socket;
import java.net.SocketAddress;
 
import javax.swing.plaf.synth.SynthProgressBarUI;
 
import io.netty.bootstrap.ServerBootstrap;
import io.netty.channel.ChannelFuture;
import io.netty.channel.ChannelInitializer;
import io.netty.channel.ChannelOption;
import io.netty.channel.ChannelPipeline;
import io.netty.channel.EventLoopGroup;
import io.netty.channel.nio.NioEventLoopGroup;
import io.netty.channel.socket.SocketChannel;
import io.netty.channel.socket.nio.NioServerSocketChannel;
import io.netty.handler.logging.LogLevel;
import io.netty.handler.logging.LoggingHandler;
 
public class EchoServer {
 
    // 서버 소켓 포트 번호를 지정합니다.
    //private static final int PORT = 30081;
 
    public static void main(String[] args) {
    /*
        NioEventLoop는 I/O 동작을 다루는 멀티스레드 이벤트 루프입니다.
        네티는 다양한 이벤트 루프를 제공합니다.
        이 예제에서는 두개의 Nio 이벤트 루프를 사용합니다.
        첫번째 'parent' 그룹은 인커밍 커넥션(incomming connection)을 액세스합니다.
        두번째 'child' 그룹은 액세스한 커넥션의 트래픽을 처리합니다.
        만들어진 채널에 매핑하고 스레드를 얼마나 사용할지는 EventLoopGroup 구현에 의존합니다.
        그리고 생성자를 통해서도 구성할 수 있습니다.
    */
        EventLoopGroup parentGroup = new NioEventLoopGroup(1);
        EventLoopGroup childGroup = new NioEventLoopGroup();
        try{
            // 서버 부트스트랩을 만듭니다. 이 클래스는 일종의 헬퍼 클래스입니다.
            // 이 클래스를 사용하면 서버에서 Channel을 직접 세팅 할 수 있습니다.
            
            ServerBootstrap sb = new ServerBootstrap();
        
            sb.group(parentGroup, childGroup)
            // 인커밍 커넥션을 액세스하기 위해 새로운 채널을 객체화 하는 클래스 지정합니다.
            .channel(NioServerSocketChannel.class)
            // 상세한 Channel 구현을 위해 옵션을 지정할 수 있습니다.
            //동시에 수용 가능한 클라이언트 연결 요청 개수를 서버 소켓에 설정 가능한 옵션
            .option(ChannelOption.SO_BACKLOG, 100)
            .handler(new LoggingHandler(LogLevel.INFO))
            // 새롭게 액세스된 Channel을 처리합니다.
            
            // ChannelInitializer는 특별한 핸들러로 새로운 Channel의
            // 환경 구성을 도와 주는 것이 목적입니다.
            .childHandler(new ChannelInitializer<SocketChannel>() {
                @Override
                protected void initChannel(SocketChannel sc) throws Exception {
                    ChannelPipeline cp = sc.pipeline();
                    cp.addLast(new EchoServerHandler());
 
                }
            });
            
            //SocketAddress address = new InetSocketAddress("169.254.40.218",10081);
    //        SocketAddress address2 = new InetSocketAddress("172.10.11.20",10081);
            
            // 인커밍 커넥션을 액세스하기 위해 바인드하고 시작합니다.
            ChannelFuture cf = sb.bind(8080).sync();
//            cf = sb.bind(10087).sync();
            
            // 서버 소켓이 닫힐때까지 대기합니다.
            cf.channel().closeFuture().sync();
        //    cf2.channel().closeFuture().sync();
        }catch(Exception e){
            e.printStackTrace();
        }
        finally{
            parentGroup.shutdownGracefully();
            childGroup.shutdownGracefully();
        }
    }
}
cs


Server Inbound Handler


1
2
3
4
5
6
7
8
9
10
11
12
13
14
15
16
17
18
19
20
21
22
23
24
25
26
27
28
29
30
 
package netty_framework;
 
import io.netty.channel.ChannelHandlerAdapter;
import io.netty.channel.ChannelHandlerContext;
import io.netty.channel.ChannelInboundHandlerAdapter;
 
public class EchoServerHandler extends ChannelInboundHandlerAdapter {
 
    // 채널을 읽을 때 동작할 코드를 정의 합니다.
    @Override
    public void channelRead(ChannelHandlerContext ctx, Object msg) throws Exception {
        System.out.println("server read : " + msg);
        System.out.println(ctx.channel().localAddress().toString() );
        ctx.write(msg); // 메시지를 그대로 다시 write 합니다.
    }
 
    // 채널 읽는 것을 완료했을 때 동작할 코드를 정의 합니다.
    @Override
    public void channelReadComplete(ChannelHandlerContext ctx) throws Exception {
        ctx.flush(); // 컨텍스트의 내용을 플러쉬합니다.
    };
 
    // 예외가 발생할 때 동작할 코드를 정의 합니다.
    @Override
    public void exceptionCaught(ChannelHandlerContext ctx, Throwable cause) throws Exception {
        cause.printStackTrace(); // 쌓여있는 트레이스를 출력합니다.
        ctx.close(); // 컨텍스트를 종료시킵니다.
    }
}
cs


Client


1
2
3
4
5
6
7
8
9
10
11
12
13
14
15
16
17
18
19
20
21
22
23
24
25
26
27
28
29
30
31
32
33
34
35
36
37
38
39
40
41
42
43
44
45
46
47
package netty_framework;
 
import io.netty.bootstrap.Bootstrap;
import io.netty.channel.ChannelFuture;
import io.netty.channel.ChannelInitializer;
import io.netty.channel.ChannelOption;
import io.netty.channel.ChannelPipeline;
import io.netty.channel.EventLoopGroup;
import io.netty.channel.nio.NioEventLoopGroup;
import io.netty.channel.socket.SocketChannel;
import io.netty.channel.socket.nio.NioSocketChannel;
 
public class EchoClient {
    // 호스트를 정의합니다. 로컬 루프백 주소를 지정합니다.
    private static final String HOST = "localhost";
    // 접속할 포트를 정의합니다.
    private static final int PORT = 8080;
    // 메시지 사이즈를 결정합니다.
    static final int MESSAGE_SIZE = 256;
 
    public static void main(String[] args) {
        EventLoopGroup group = new NioEventLoopGroup();
 
        try{
            Bootstrap b = new Bootstrap();
            b.group(group)
            .channel(NioSocketChannel.class)
            .option(ChannelOption.TCP_NODELAY, true)
            .handler(new ChannelInitializer<SocketChannel>() {
                @Override
                protected void initChannel(SocketChannel sc) throws Exception {
                    ChannelPipeline cp = sc.pipeline();
                    cp.addLast(new EchoClientHandler());
                }
            });
 
            ChannelFuture cf = b.connect(HOST, PORT).sync();
            cf.channel().closeFuture().sync();
        }
        catch(Exception e){
            e.printStackTrace();
        }
        finally{
            group.shutdownGracefully();
        }
    }
}
cs


Client Inbound Handler


1
2
3
4
5
6
7
8
9
10
11
12
13
14
15
16
17
18
19
20
21
22
23
24
25
26
27
28
29
30
31
32
33
34
35
36
37
38
39
40
41
42
43
44
45
46
47
48
49
50
51
52
53
54
55
56
57
58
59
60
61
62
63
64
65
66
67
68
69
70
71
72
73
74
75
76
77
78
79
80
81
82
83
84
85
86
87
88
89
package netty_framework;
 
import java.util.Arrays;
 
import io.netty.buffer.ByteBuf;
import io.netty.buffer.Unpooled;
import io.netty.channel.ChannelHandlerAdapter;
import io.netty.channel.ChannelHandlerContext;
import io.netty.channel.ChannelInboundHandlerAdapter;
 
public class EchoClientHandler extends ChannelInboundHandlerAdapter{
    private final ByteBuf message;
 
    // 초기화
    public EchoClientHandler(){
        message = Unpooled.buffer(EchoClient.MESSAGE_SIZE);
        // 예제로 사용할 바이트 배열을 만듭니다.
        byte[] str = "abcefg".getBytes();
        // 예제 바이트 배열을 메시지에 씁니다.
        message.writeBytes(str);
        message.writeByte((byte)0x11);
 
    }
 
    // 채널이 활성화 되면 동작할 코드를 정의합니다.
    @Override
    public void channelActive(ChannelHandlerContext ctx) throws Exception {
        // 메시지를 쓴 후 플러쉬합니다.
        ctx.writeAndFlush(message);
    }
    
    public byte[] getMessageID(byte[] body) {
 
        int readCount = 0;
        // ByteBuf buf = Unpooled.buffer(body.length);
        int bodySize = body.length;
 
        for (int i = 0; i < bodySize; i++) {
            if (body[i] == (byte)0x11) {
                break;
            }
            readCount++;
        }
 
        byte[] messageID = new byte[readCount];
 
        messageID = Arrays.copyOfRange(body, 0, readCount);
 
        return messageID;
 
    }
    
    
    @Override
    public void channelRead(ChannelHandlerContext ctx, Object msg)throws Exception {
        // 받은 메시지를 ByteBuf형으로 캐스팅합니다.
        ByteBuf byteBufMessage = (ByteBuf) msg;
        // 읽을 수 있는 바이트의 길이를 가져옵니다.
        int size = byteBufMessage.readableBytes();
 
        // 읽을 수 있는 바이트의 길이만큼 바이트 배열을 초기화합니다.
        byte [] byteMessage = new byte[size];
        // for문을 돌며 가져온 바이트 값을 연결합니다.
        for(int i = 0 ; i < size; i++){
            byteMessage[i] = byteBufMessage.getByte(i);
        }
        byte[] message =getMessageID(byteMessage);
        System.err.println(new String(message));
        // 바이트를 String 형으로 변환합니다.
//        String str = new String(byteMessage);
 
        // 결과를 콘솔에 출력합니다.
//        System.out.println(str);
 
        // 그후 컨텍스트를 종료합니다.
        ctx.close();
    }
    @Override
    public void channelReadComplete(ChannelHandlerContext ctx) throws Exception {
        ctx.flush();
    }
 
    @Override
    public void exceptionCaught(ChannelHandlerContext ctx, Throwable cause)
            throws Exception {
        cause.printStackTrace();
        ctx.close();
    }
}
cs


'Framework > Netty' 카테고리의 다른 글

Nety JVM Option  (0) 2018.12.02
Netty HttpClient Example Code  (0) 2018.08.04
#Nettty Framework - Codec 종류 및 사용  (0) 2018.05.21
#Nettty Framework - ByteBuffer, ByteBuf  (0) 2018.05.09
#Nettty Framework - ChannelFutureListener  (0) 2018.05.09

+ Recent posts